---
availability: VALIDATED
logo: https://www.moveworks.com/content/dam/moveworksprogram/v2/logos/integration-logos/sap-integration-logo-primary.svg
name: SAP Concur
---
# **Introduction**
SAP Concur is a leading provider of integrated travel, expense, and invoice management solutions. This guide will demonstrate how to create an **OAuth Client** in SAP Concur, authenticate with SAP Concur’s API, and test it in Agent Studio.
# **Prerequisites**
- Access to Authentication Admin in Concur
- [Install Postman](https://www.postman.com/downloads/)
# Walkthrough
You will be authenticating your Concur system with Agent Studio via the **Company Request Token Method**. This lets us generate a 1-time Company Request Token (valid for 24 hours) followed by refreshable access tokens which we’ll use to authenticate any interactions.
> **Refresh token expiration**
>
>
> For security reasons, Concur’s Refresh Tokens expire every 6 months & you will have to update the Refresh Token in the Connector every 6 months. You will have to generate a new Company Request Token and then use that Token to generate another valid Refresh token for the next 6 months.
>
## **Step 1: Create a new OAuth 2.0 App with the required scopes**
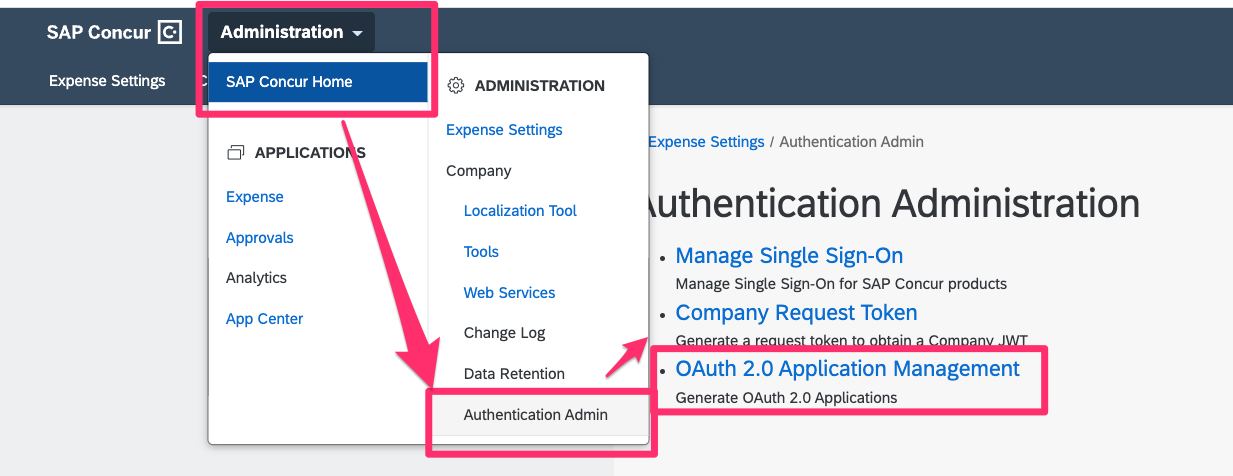
1. Navigate to OAuth 2.0 Application Management under Authentication Admin
2. Client Create New App

3. Fill in the following details:
1. App Name: `Moveworks Integration Application`
2. App Type: `Client`
3. App Description: `Moveworks' Agent Studio uses this application to authenticate API calls to your Concur instance`
4. Allowed Grants: `refresh_token`, `password`, & `client_credentials`
5. Allowed Scopes: `openid`, `EXPRPT`, `expense.report.read`, etc (Based on your requirement for the use case you are trying to build)
4. ❗Note down the generated `Client ID` & `Client Secret`

## **Step 2: Create a Company Request Token (to authenticate into our application created above)**
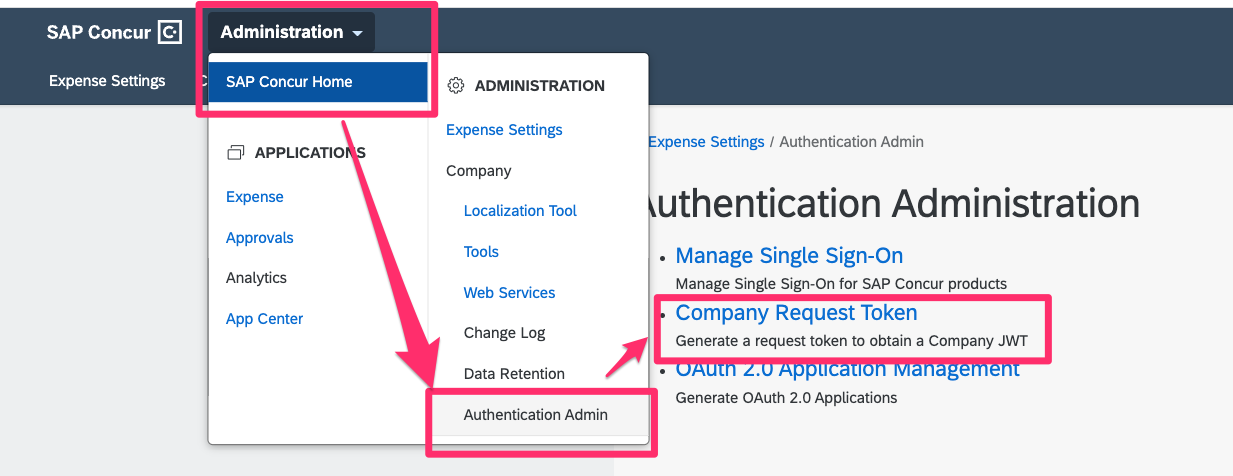
1. Navigate to Company Request Token under Authentication Admin
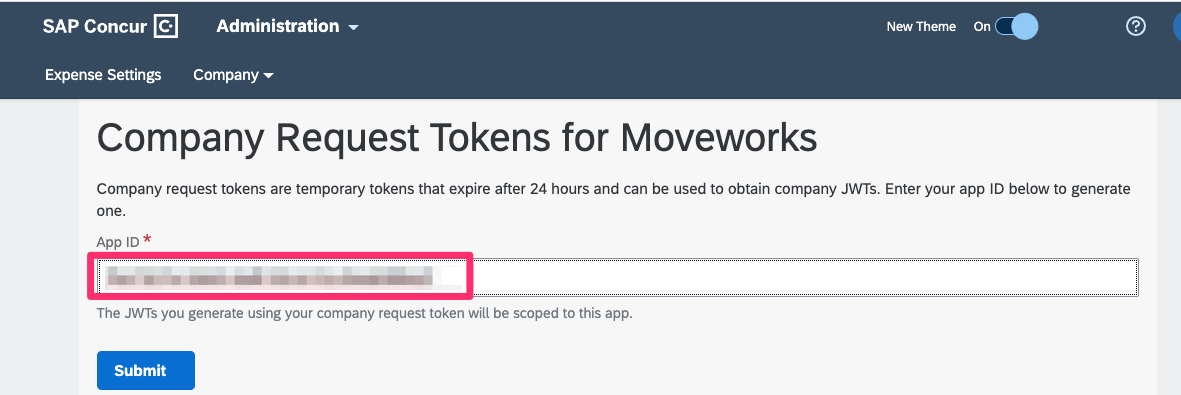
2. Now Paste the `Client ID` into the `App ID` & hit submit.
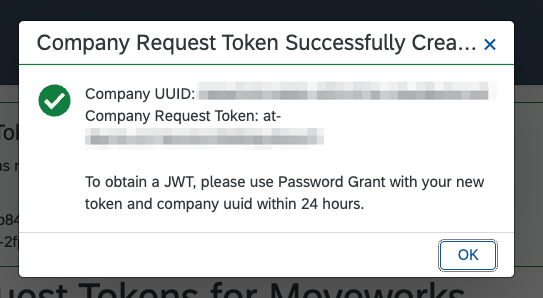
3. ❗Note down the Company UUID & Company Request Token
## **Step 3: Generate the refresh token using Postman (or similar tools)**
1. Set up your request in Postman with your `Client Credentials` and `Password` grant to generate the Refresh token
```bash
curl --location 'https://us2.api.concursolutions.com/oauth2/v0/token' \
--header 'Content-Type: application/x-www-form-urlencoded' \
--data-urlencode 'grant_type=password' \
--data-urlencode 'client_id={{concur_client_id}}' \
--data-urlencode 'client_secret={{concur_client_secret}}' \
--data-urlencode 'username={{concur_uuid}}' \
--data-urlencode 'password={{concur_request_token}}' \
--data-urlencode 'credtype=authtoken'
```

2. Replace the values within `{{_}}` with the actual values you obtained from Step 1 and 2 and execute the API. You should get a successful response with the following information:
```json
{
"expires_in": "3600",
"scope": "{{space separated app-scopes}}",
"token_type": "Bearer",
"access_token": "{{access_token}}",
"refresh_token": "{{refresh_token}}",
"id_token": "{{oidc_token}}",
"geolocation": "https://us2.api.concursolutions.com"
}
```
3. Use the `refresh_token` you obtained from the previous step to hit the same API endpoint but now with a different grant as follows:
```bash
curl --location 'https://us2.api.concursolutions.com/oauth2/v0/token' \
--header 'Content-Type: application/x-www-form-urlencoded' \
--data-urlencode 'grant_type=refresh_token' \
--data-urlencode 'client_id={{concur_client_id}}' \
--data-urlencode 'client_secret={{concur_client_secret}}' \
--data-urlencode 'refresh_token={{concur_refresh_token}}'
```
4. Replace the values and execute this API. You would see the same response as previous but now we will use the `access_token` we got from this API to authenticate our API calls
## **Step 4: Integrate with Agent Studio**
1. In Agent Studio, create a new connector with the following configuration (please name it accordingly to identify while creating use cases):
- Description: `Connect to Concur APIs`
- Base URL: `https://us2.api.concursolutions.com`
- Auth Config: `Oauth2`
- Oauth2 Grant Type: `Refresh Token Grant`
- Client ID: `{{concur_client_id}}`
- Client Secret: `{{concur_client_secret}}`
- Refresh Token Grant Refresh Token: `{{concur_refresh_token}}`
- Oauth2 Token Url: `https://us2.api.concursolutions.com/oauth2/v0/token`
Click on `Save` to submit the credentials and your connector will be ready.
2. Define your API action for looking up expense reports
```bash
curl --location 'https://us2.api.concursolutions.com/api/v3.0/expense/reports?user=ALL&limit=1' \
--header 'Accept: application/json' \
--header 'Authorization: Bearer {{concur_access_token}}'
```
- Path: `/api/v3.0/expense/reports`
- Method: `GET`
- Headers:
| Key | Value |
| --- | --- |
| Accept | application/json |
- Query parameters:
| Key | Value |
| --- | --- |
| user | ALL |
| limit | 1 |
3. Test your setup in Agent Studio and look for a successful execution (Response code: 200)

# **Congratulations!**
You've successfully integrated Concur’s API with Agent Studio. This opens up a variety of automation and integration possibilities within your Concur instance.